Mastering 2D Movement in Godot: From Basics to Professional Platformers
If you’ve ever lost track of time while leaping between platforms, dodging obstacles, or simply enjoying movement that feels just right in your hands, you know that the magic of a 2D platformer largely lies in its movement system.
From Mario’s jumps to Celeste’s acrobatic fluidity, movement isn’t just how a character gets from point A to B; it’s the primary language through which the player interacts and engages with the game world. Getting that feel right can be the difference between being frustrating to being addictive.
In this article, we’ll break down how Godot handles 2D movement. We’ll cover everything from the essential foundations to those polished techniques that make a game feel professional and, most importantly, fun! We’ll explore how to build a solid base and then how to add those layers of “game feel”.
What Makes a Great 2D Platformer Movement System?
Let’s lay the groundwork first. What exactly are we talking about when we refer to a “2D platformer movement system”? In essence, it’s the set of rules and mechanics that dictate how the player-controlled character interacts with and moves through the game world.
For your game’s characters to come alive, they need to be able to perform some fundamental actions:
- Player Input: How does the player tell the character what to do? Usually, through the keyboard (arrow keys, WASD, spacebar) or a gamepad. Godot makes managing these inputs easy through its
InputMap. - Horizontal Movement: The ability to run or walk left and right. It sounds simple, but speed, acceleration, and deceleration here are crucial for the game’s feel, even things like Coyote Time.
- Jumping: The act of defying gravity to reach new heights, avoid enemies, or cross chasms. Jump height, airtime, and how it’s controlled are vital.
- Gravity: The ever-present force pulling our character downwards. Without it, we’d all float endlessly to the furthest reaches of the Y axis. Adjusting its intensity is key to the character’s “weight.”
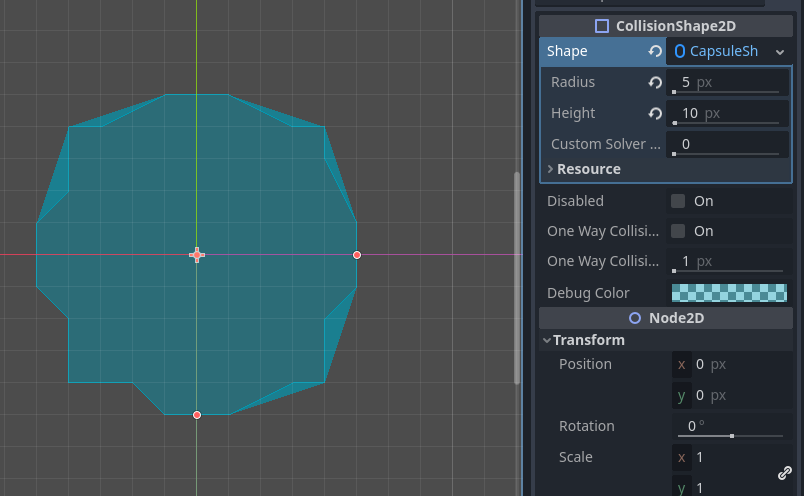
- Collisions: Characters needs to understand when it’s treading on the ground, hitting a wall, or landing on a platform. Godot handles this with nodes like
CharacterBody2Dand itsCollisionShape2D.
The main node we’ll work with for our playable character will be CharacterBody2D. This node is specifically designed for characters that need custom movement control, where we, the developers, dictate how it responds to inputs and physics, rather than it being a purely engine-simulated physics object. We’ll accompany it with a CollisionShape2D to define its physical shape and, likely, an AnimatedSprite2D or Sprite2D to give it its visual appearance.
What Makes a 2D Movement System “Good”?
We’ve all played that game where the character feels clunky, slippery, or just doesn’t respond as we expect. And conversely, we’ve experienced how good it feels when controlling a character that moves just how we want to. That game feel, isn’t accidental; it’s the result of thoughtful design and implementation.
Here are some key ingredients for an exceptional 2D movement system:
- Responsiveness: When the player presses a button, the character should react immediately. Delays, however small, can make the controls feel sluggish or disconnected.
- Precise yet Believable Control: The player should feel in complete command, but the character should also have a certain “weight” and obey physics that, while not strictly realistic (pure rigid bodies are often not ideal for platformers, remember that realism is not always fun), are consistent and predictable. We want control, not a physics simulation that wrests control away at crucial moments.
- Forgiveness (Player-Friendly Factor): Platformers can be challenging, but they shouldn’t feel unfair (usually, at least). Some techniques help make the game more lenient without sacrificing challenge:
- Coyote Time: Ever tried to jump right at the edge of a platform and felt like you fell even though you swore you pressed the button in time? “Coyote time” is the standard industry name of this mechanic, it gives you a tiny window of a few fractions of a second to jump after you’ve walked off the platform. It’s a subtle but powerful lifesaver!

Watch this video from StevePixelFace that explains it perfectly while in Godot - Jump Buffering: Similarly, if you press the jump button an instant before hitting the ground, the game can “remember” that press and execute the jump as soon as you land. This makes chained jumps and quick movements feel much smoother.
- Coyote Time: Ever tried to jump right at the edge of a platform and felt like you fell even though you swore you pressed the button in time? “Coyote time” is the standard industry name of this mechanic, it gives you a tiny window of a few fractions of a second to jump after you’ve walked off the platform. It’s a subtle but powerful lifesaver!
- Fluidity and Visual/Auditory Polish:
- Acceleration and Deceleration: Instead of the character reaching top speed instantly and stopping on a dime, smooth acceleration and deceleration make movement feel more natural and polished.
- Variable Jump Height: Allowing the player to control jump height by holding the button longer or shorter adds a layer of skill and control. A short tap for a small hop, a long press to reach that distant platform.
- Coordinated Animations: Animations aren’t just decorative; they should reinforce the character’s state and action. A run animation when running, a jump animation when jumping, a fall animation, etc. A character sliding in their “idle” animation while moving breaks immersion.
- Sound Effects: A “thump” on landing, a “swoosh” when jumping… it all contributes hugely to the feel.
Avoiding common mistakes is just as important. A character that feels too “floaty” or too “heavy,” unresponsive controls, or mechanics added without a clear purpose (like a double jump that doesn’t fit the level design) can ruin the experience. The goal is to find that sweet spot where the challenge comes from the level design, not from fighting the controls.
Although made for Unity, this video from Sasquatch B Studios shows all of these features and how well they complement each other
Godot’s Approach to 2D Movement
-
Nodes and Scenes: Godot’s node-based and scene architecture is intuitive and powerful. You can build your character as a scene composed of several specialized nodes:
CharacterBody2D: As we mentioned, this is the heart of our character. It’s specifically designed for bodies moved by code, giving you full control over their behavior. It’s not aRigidBody2Dthat simply reacts to physics forces; you write the logic that updates itsvelocity.CollisionShape2D: A child of theCharacterBody2D, it defines the character’s geometric shape for collision detection. It can be a capsule (great for slopes), a rectangle, etc.AnimatedSprite2D(orSprite2D): For visual representation and animations.- Each node has a clear purpose, making the structure easy to understand and expand.
-
move_and_slide(): This is the main function you’ll use in yourCharacterBody2D‘s script to move it. What it does is take your character’s current velocity vector and try to move it along that vector during a physics frame. The magic is that it handles all collisions for you:- If it hits something, it will stop or slide along the surface (depending on the nature of the collision and the
CharacterBody2D‘s settings). - It updates the body’s state, such as whether it’s on the floor (
is_on_floor()), on a wall (is_on_wall()), or on the ceiling (is_on_ceiling()). These functions are crucial for your game’s logic (e.g., only allowing jumps ifis_on_floor()is true). - All this saves you from manually writing complex collision detection and response routines.
- If it hits something, it will stop or slide along the surface (depending on the nature of the collision and the
Implementing Your Movement System in Godot
Don’t worry, we’re not going to write a complete game here, but we’ll give you the building blocks and conceptual logic that you can adapt and expand. I highly recommend you consult Godot’s official documentation on 2D movement and watch the reference videos you mentioned for more detailed and visual code examples.
1. Character Structure (Nodes):
First, set up your player scene. A typical structure might be:
Player (CharacterBody2D)
├── AnimatedSprite2D (for visual animations)
├── CollisionShape2D (defines the physical shape, e.g., CapsuleShape2D)
└── Camera2D (optional, if you want the camera to follow the player)
Make sure the main script is attached to your Player (CharacterBody2D) node.
2. Essential Variables (in your GDScript):
At the beginning of your script, define the variables that will control your character’s behavior.
# Player.gd
extends CharacterBody2D

# Movement Constants
const SPEED = 150.0       # Horizontal movement speed (pixels/second)
const JUMP_VELOCITY = -300.0 # Jump strength (negative because Y goes down)

# Gravity - you can get it from project settings or define it here
var gravity = ProjectSettings.get_setting("physics/2d/default_gravity")

# Other variables you might need
var air_jumps = 1         # For a double jump
var current_air_jumps = 0

# Variables for "game feel" techniques (we'll initialize them later)
var coyote_timer = 0.0
const COYOTE_TIME_THRESHOLD = 0.1 # 100 milliseconds of coyote time

var jump_buffer_timer = 0.0
const JUMP_BUFFER_TIME_THRESHOLD = 0.1 # 100 milliseconds for jump buffer
3. Movement Logic in _physics_process(delta):
The _physics_process(delta) function is called every physics frame. This is where we’ll update our character’s velocity and call move_and_slide().
func _physics_process(delta):
    # Apply gravity
    if not is_on_floor():
        velocity.y += gravity * delta
    else:
        # Reset air jumps and coyote time when on the floor
        current_air_jumps = air_jumps
        coyote_timer = COYOTE_TIME_THRESHOLD # Reload coyote time

    # Update timers
    if coyote_timer > 0:
        coyote_timer -= delta
    if jump_buffer_timer > 0:
        jump_buffer_timer -= delta

    # Handle Jump input (with buffer and coyote time)
    if Input.is_action_just_pressed("jump"): # "jump" is an action defined in InputMap
        jump_buffer_timer = JUMP_BUFFER_TIME_THRESHOLD

    if jump_buffer_timer > 0:
        if is_on_floor() or coyote_timer > 0: # Normal jump or coyote time jump
            velocity.y = JUMP_VELOCITY
            jump_buffer_timer = 0 # Consume buffer
            coyote_timer = 0 # Consume coyote time if used
        elif current_air_jumps > 0: # Air jump (double jump, etc.)
            velocity.y = JUMP_VELOCITY * 0.8 # Perhaps a bit weaker
            current_air_jumps -= 1
            jump_buffer_timer = 0 # Consume buffer

    # Handle Horizontal input
    var direction = Input.get_axis("move_left", "move_right") # "move_left" & "move_right" from InputMap

    # Movement with simple acceleration/deceleration (you can make this more complex)
    if direction:
        # We use move_toward for basic acceleration/deceleration
        velocity.x = move_toward(velocity.x, direction * SPEED, SPEED * 2.0 * delta) # Last value is acceleration
        # Flip the sprite
        if $AnimatedSprite2D: # Ensure the node exists
            $AnimatedSprite2D.flip_h = (direction < 0)
    else:
        velocity.x = move_toward(velocity.x, 0, SPEED * 2.0 * delta) # Decelerate to a stop

    move_and_slide()

    # Update animations (simplified)
    update_animations()
4. Updating Animations (Conceptual Example):
This function would be called at the end of _physics_process.
func update_animations():
    if not $AnimatedSprite2D: return # Exit if no AnimatedSprite2D

    if not is_on_floor():
        if velocity.y < 0:
            $AnimatedSprite2D.play("jump")
        else:
            $AnimatedSprite2D.play("fall")
    else:
        if abs(velocity.x) > 5: # A small threshold to avoid switching to "run" if barely moving
            $AnimatedSprite2D.play("run")
        else:
            $AnimatedSprite2D.play("idle")
Remember to set up these animations (“jump”, “fall”, “run”, “idle”) in your AnimatedSprite2D node.
5. Implementing Additional Enhancements:
-
Variable Jump Height: For this, you need to detect when the jump button is released. If the character is rising (
velocity.y < 0) and the jump button is released, you can reduce theyvelocity (e.g.,velocity.y *= 0.5).# Inside _physics_process, after handling initial jump if Input.is_action_just_released("jump") and velocity.y < 0: velocity.y *= 0.5 # Or velocity.y = max(velocity.y, JUMP_VELOCITY * 0.3) to not cut too much -
Modularity: Video 2 from your reference list talks about a modular approach by creating components. While we didn’t create separate nodes here for brevity, you can see how the logic is grouped in
_physics_processto handle gravity, jumping, and horizontal movement. For larger projects, separating these logics into smaller functions (likehandle_gravity(delta),handle_jump(delta),handle_horizontal_movement(delta)) is excellent practice.
A Few Words on the “Code”: The snippets above are conceptual and simplified to illustrate the logic. In a real game, you’ll want to:
- Finely tune all values (speed, gravity, coyote/buffer times, jump forces).
- Handle more states (crouching, dashing, attacking, etc.).
- Have a more robust animation system, perhaps using an
AnimationTreefor complex transitions. - Organize your code into more specific functions for clarity.
Godot’s documentation on CharacterBody2D and 2D movement tutorials are your best friends here, along with the videos you’ve been watching. Experiment!
Customization and Next Steps
- Experiment Fearlessly: There are no magic values that work for every game. Play with the numbers:
- How fast should your character be?
- How high should they jump?
- How does gravity feel? Too floaty or too heavy?
- Adjust the
COYOTE_TIME_THRESHOLDandJUMP_BUFFER_TIME_THRESHOLD. Small changes here can have a big impact on the feel.
- Add More Mechanics: Once you’re comfortable with the basics, consider expanding your character’s abilities:
- Dash: A quick burst of movement in one direction.
- Wall Jump: The ability to jump off walls.
- Crouch and Slide: For getting through tight spaces.
- Different States: Maybe your character moves differently underwater or on ice.
- Observe and Learn: Play your favorite platformers and pay attention to how the movement feels. What do you like about it? How could you emulate those sensations in Godot?
Remember, the goal is to create a movement system that is not only functional but also fun and aligns with your game’s overall vision.
Conclusion
Creating a great movement system is an iterative art. Don’t be discouraged if it doesn’t feel perfect on the first try. Test, tweak, get feedback, and above all, have fun!